> ## Documentation Index
> Fetch the complete documentation index at: https://docs.raven.dev/llms.txt
> Use this file to discover all available pages before exploring further.
# Razorpay
> Razorpay Extension setup with Raven
This guide will help you understand how you can use Raven to send Razorpay's
payment related notifications with your own custom content, your own branding or
your own providers.
For example, you can send Invoices to your customers, on SMS and Email with your
own custom message and with your sender-id or email. You can also choose to send
Invoices on WhatsApp. If you have your own SMS, WhatsApp or Email providers, you
can easily use them too to send your notifications.
We recommend going through the Quick Setup in the Get Started tab. It will
help you understand how Raven works in less than 5 mins.
## How will Raven send notifications from Razorpay?
Once you setup the Razorpay extension, Raven will start intercepting events from
your Razorpay account. For example, whenever you create an invoice in Razorpay,
Raven will receive that event and trigger the notification that you configured.
## Razorpay Setup
### Step 1. Sign up
If you have not created an account with Raven already, please signup
[here](https://console.ravenapp.dev/get-started). After signup, you will land on
the Quick Setup page, where you can see how Raven works. You can complete the
Quick Setup first.
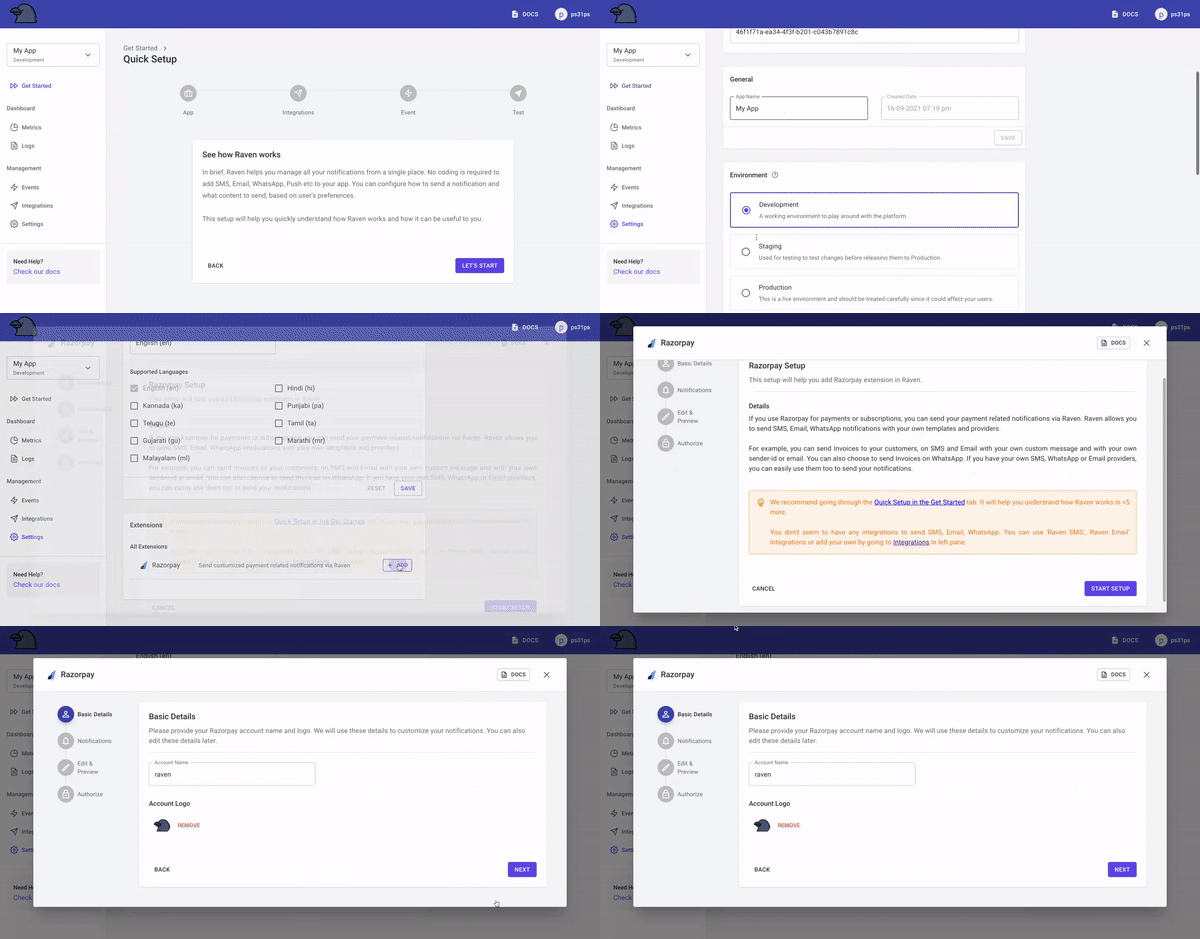
### Step 2. Add Extension
Next go to Settings tab in the left pane and search for Extensions at the bottom
of the page. There you would see a Razorpay extension under All Extensions.
Click on Add.
### Step 3. Setup
A setup dialog will open. Continue with the the Setup. Follow the steps as
mentioned below:
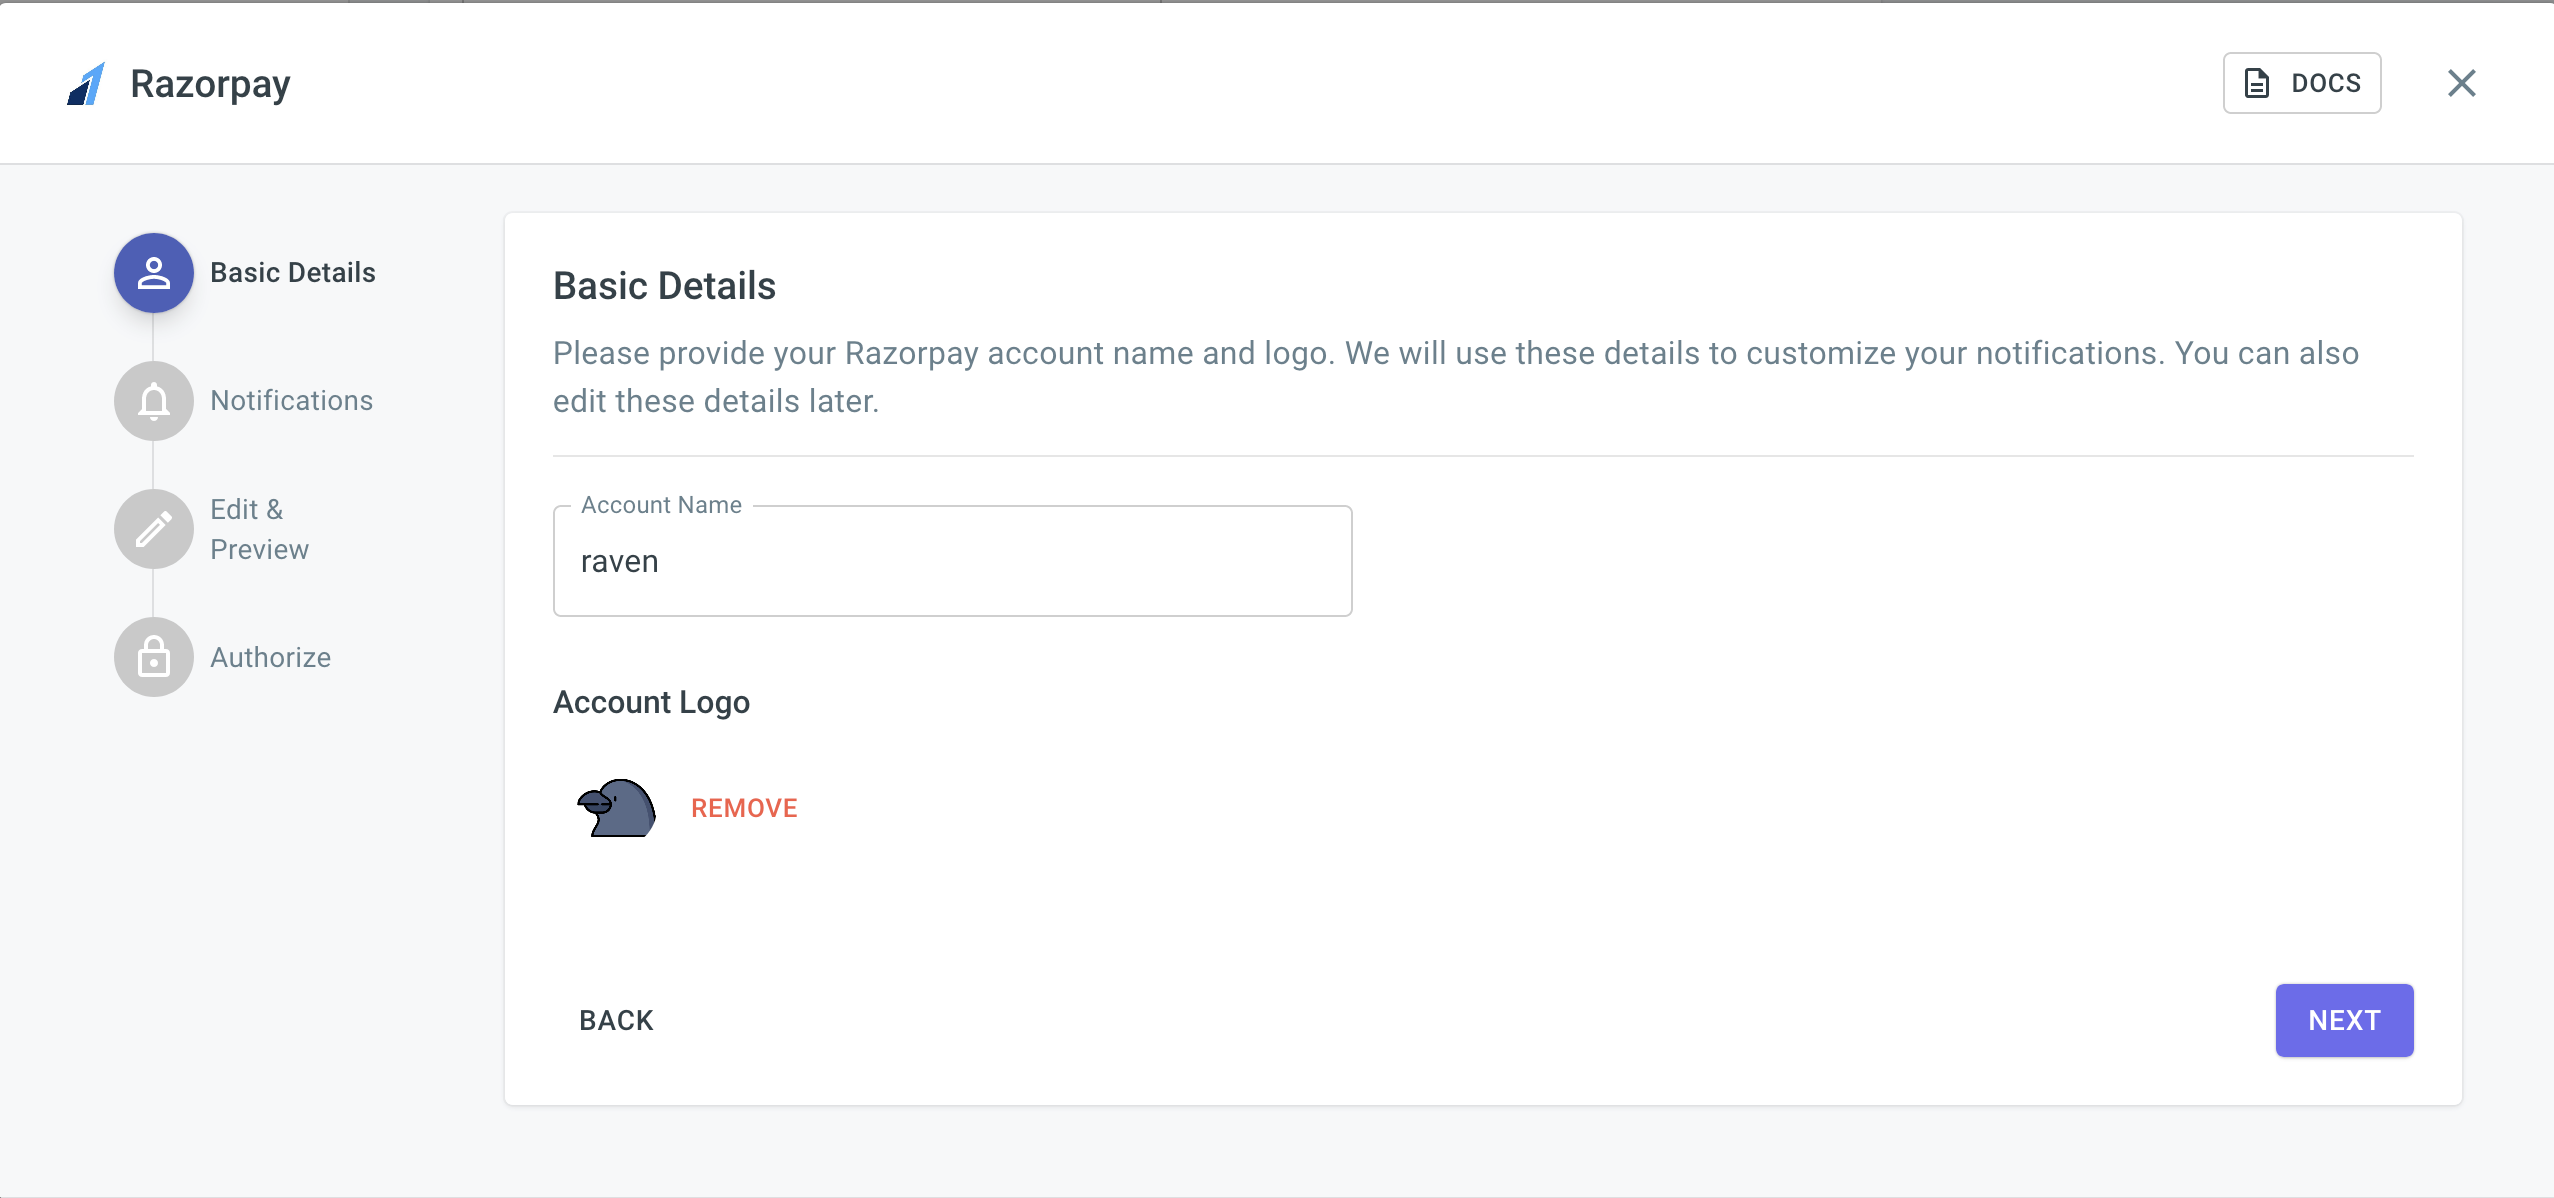
1. **Account Details**
Provide your Razorpay account name and logo. We will use these details to create
notifications with your branding.
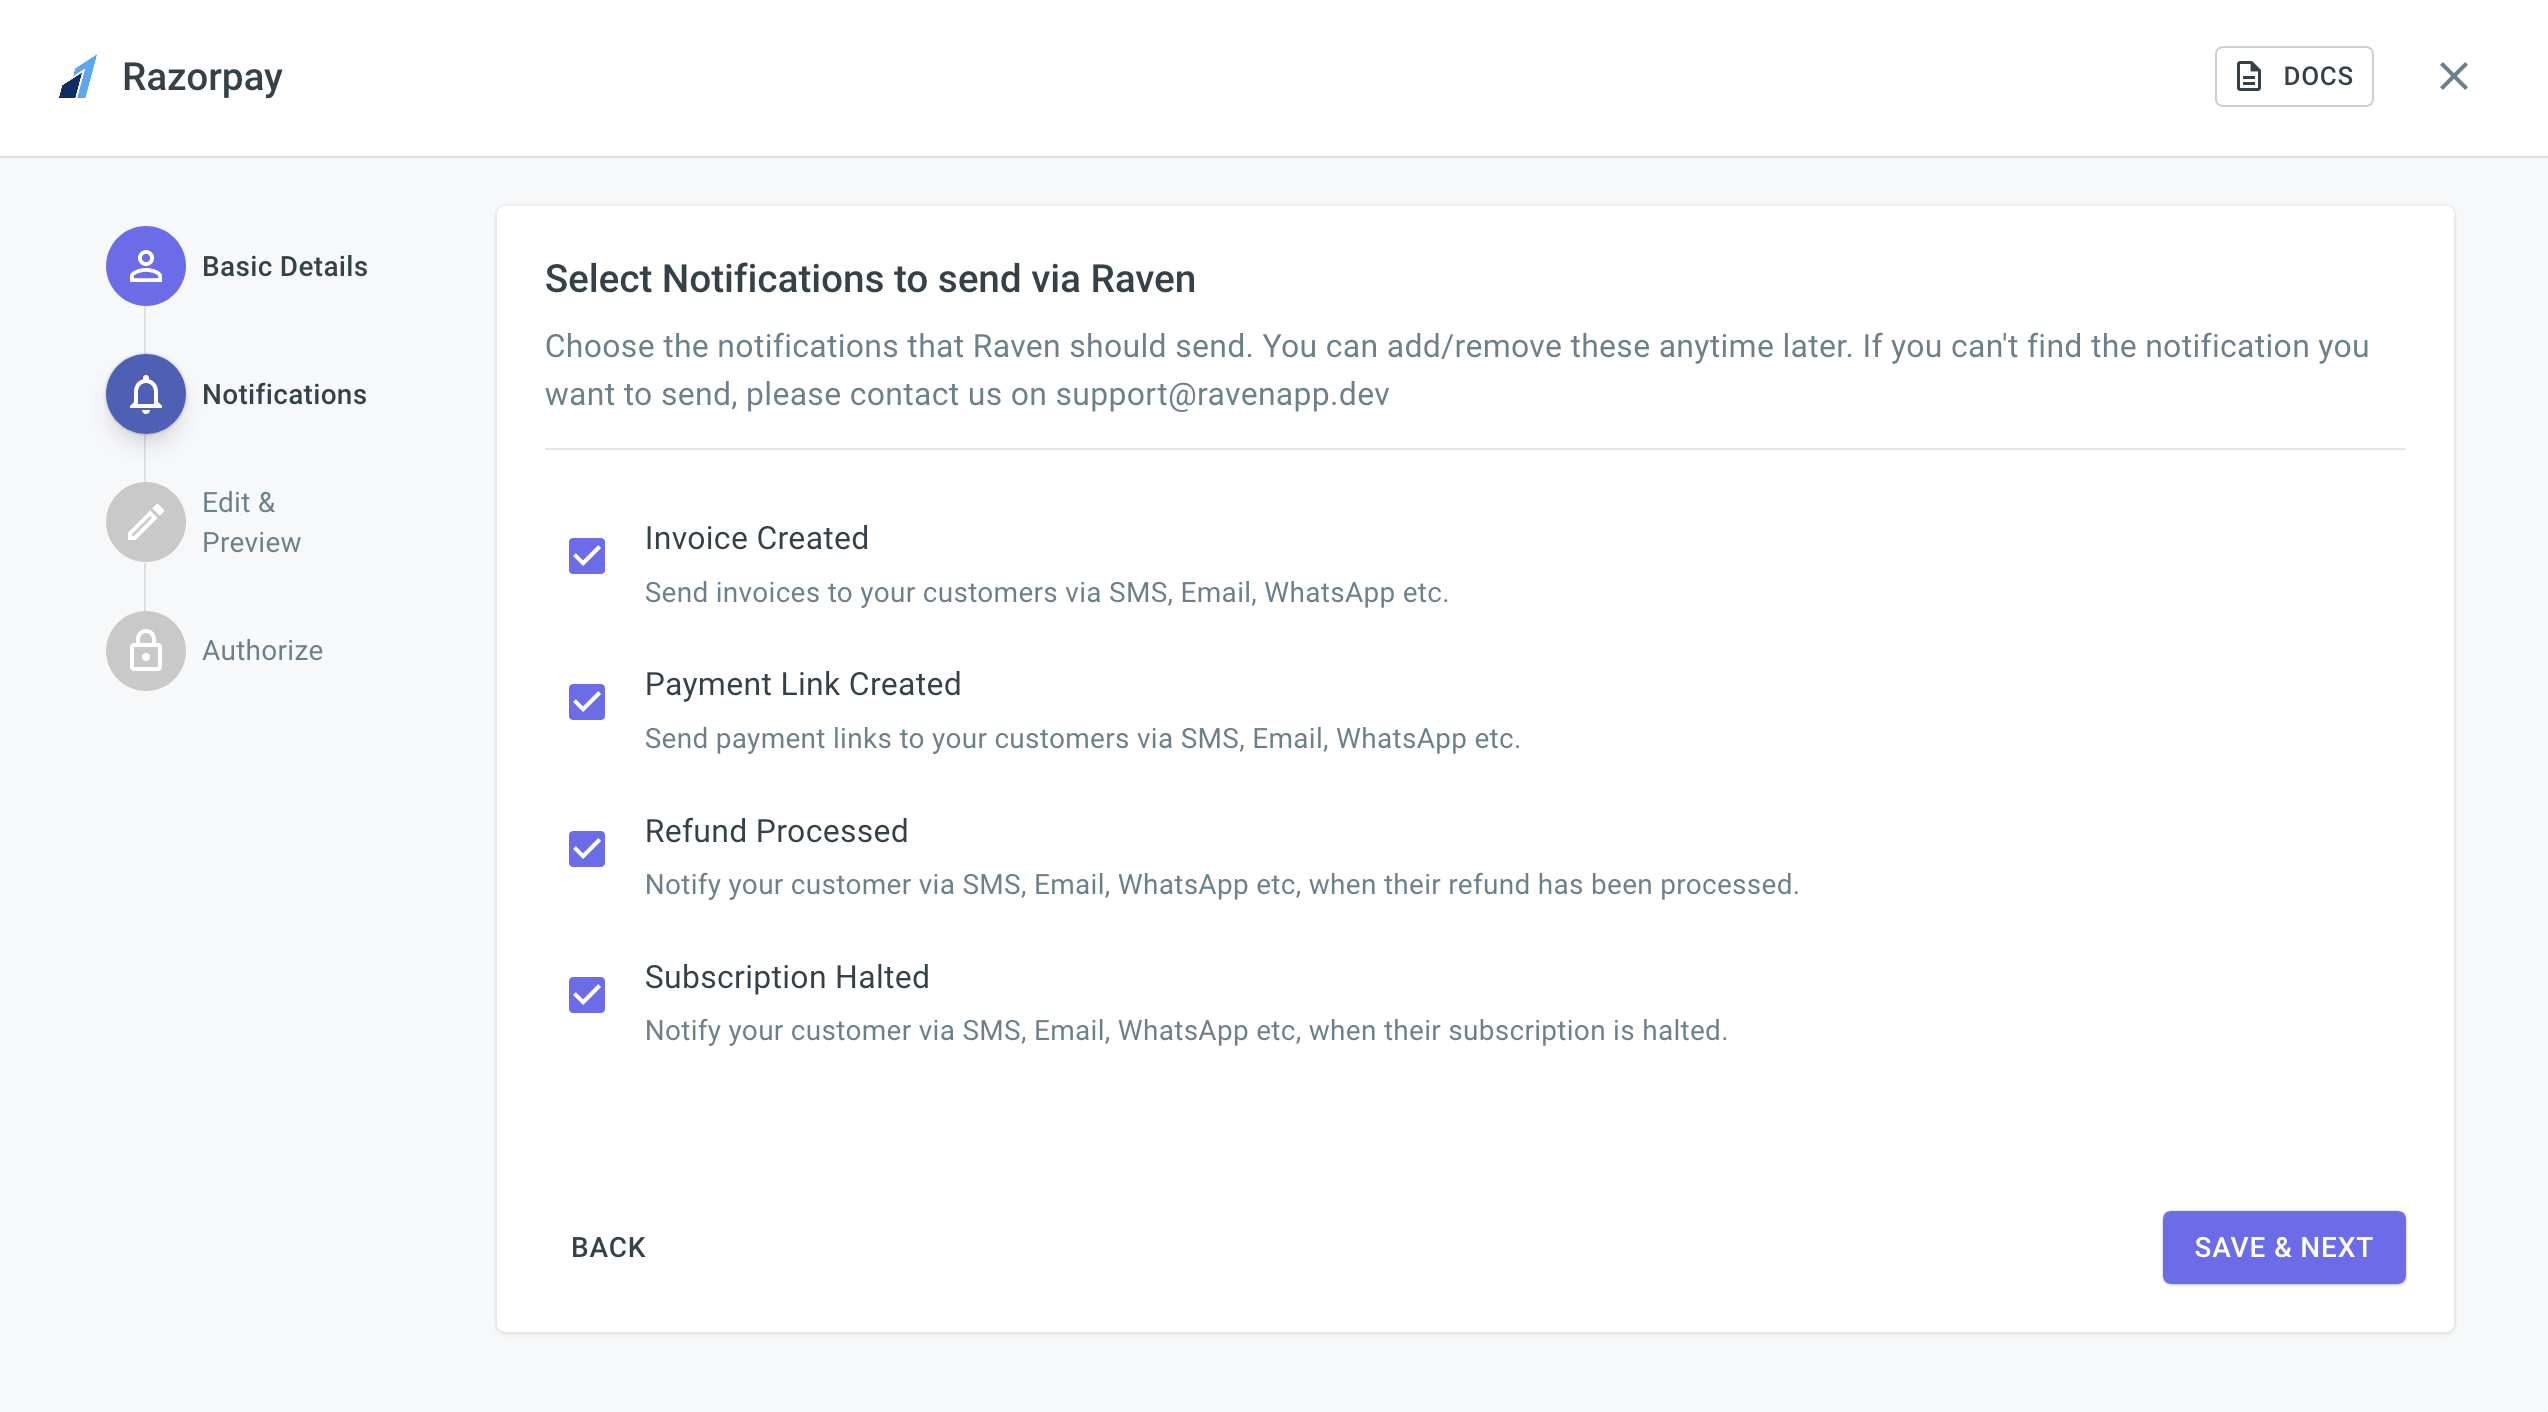
2. **Select Notifications**
Select the notifications you wish to send. Currently we support the following:
Invoice created, Payment Link Created, Payment Captured, Refund Processed &
Subscription Halted. Whenever any of this action happens in your Razorpay
account, Raven will receive this event and trigger the notification.
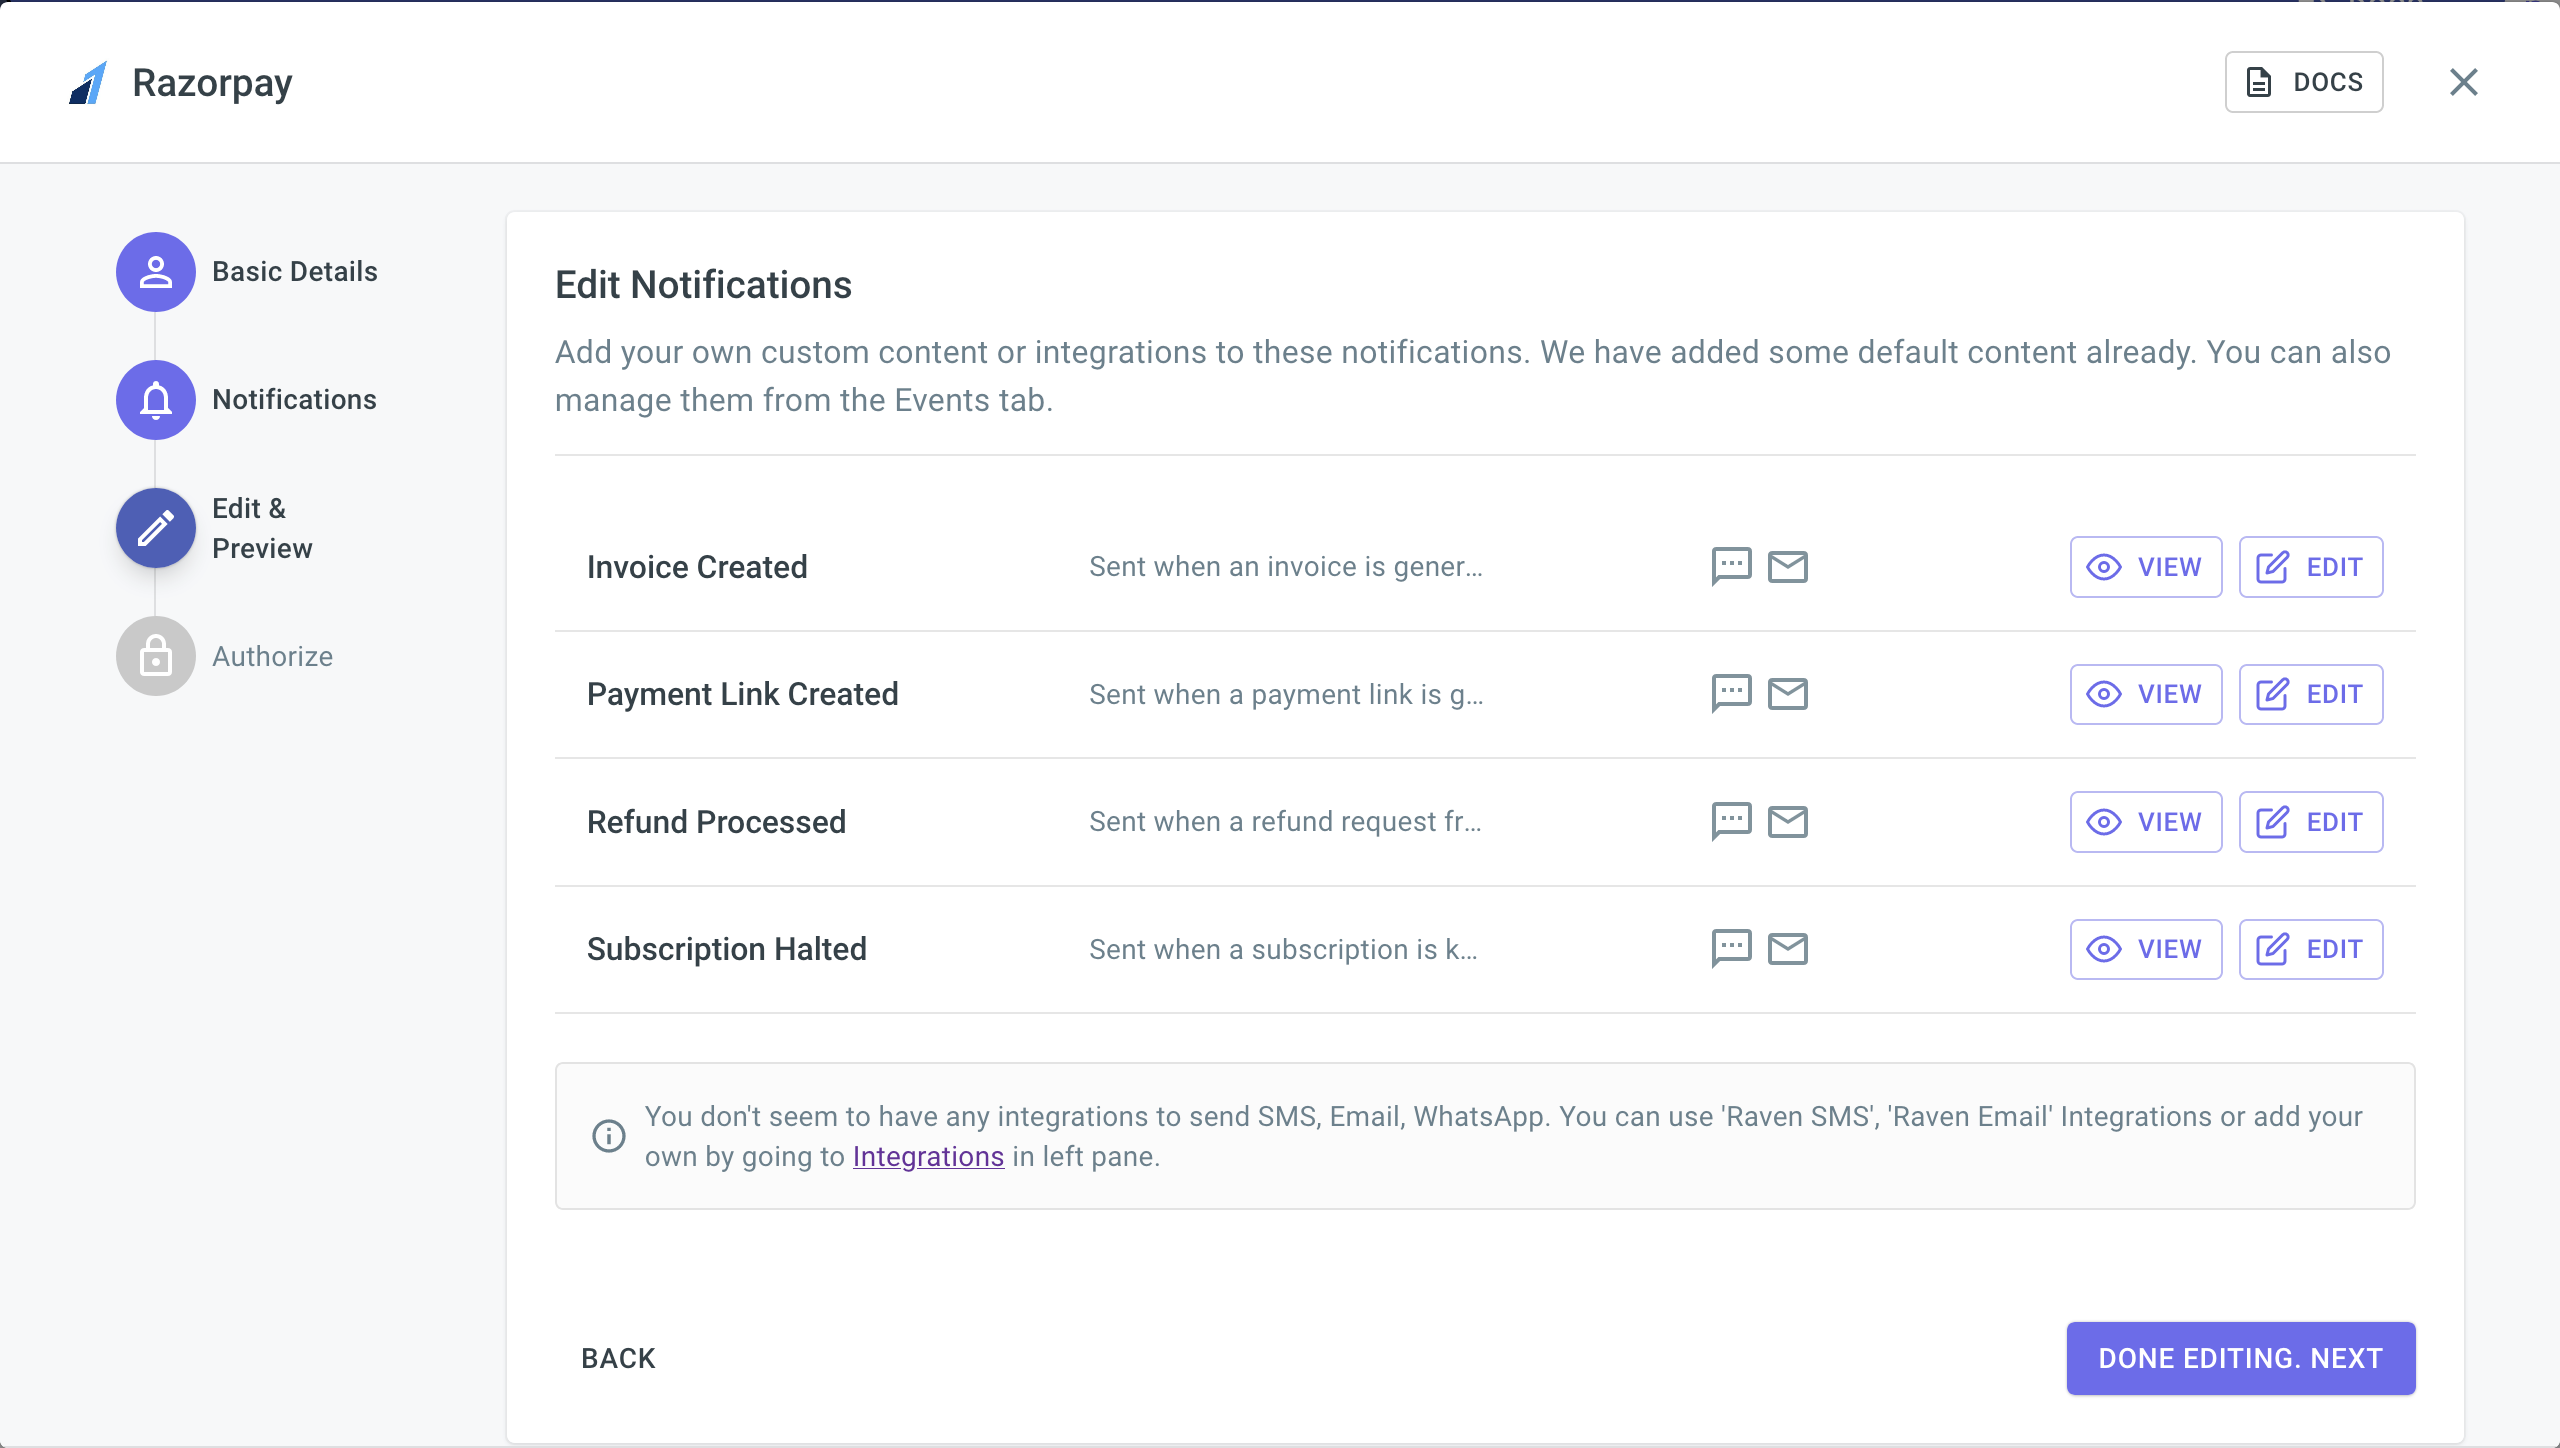
**3. Edit & Preview Notifications**
Edit the notifications that you selected in the first step. You can
* Edit which channels you want to send that notification on (like SMS, Email or
WhatsApp).
* Add your own integrations or contact us if you need help in setting them up.
* Edit the SMS and Email content of the notifications. We have an email designer
where you can design your email notifications with your branding.
If you are on the default app that was created when you signed-up, you would
also be seeing default Raven SMS and Email integrations selected for the SMS
and Email channels. To edit the default Raven SMS/Email integrations, you can
go to Integrations > Live Integrations and click on the Raven integration to
edit its details like From Name in email etc.
While editing the templates, you would see some content like this
`{{short_url}}` . This is a dynamic parameter and will get replaced by its
actual value based on the value sent by Razorpay. We currently support the
following dynamic parameters -
| Parameter | Description |
| ----------------------------------------------------- | ------------------------------------------------- |
| `{{merchant_name}}` | |
| `{{logo_url}}` | |
| Invoice/Payment link Created: `{{amount}}` | |
| Invoice/Payment link Reference Id: `{{reference_id}}` | |
| Invoice/Payment link Created: `{{short_url}}` | |
| Invoice/Payment link Created: `{{currency}}` | |
| Invoice/Payment link Created: `{{customer.email}}` | Email of the customer to whom the Invoice is sent |
| Payment Captured: `{{customer.email}}` | Email of the customer who made the payment |
| Refund Processed: `{{amount}}` | Refund Amount |
| Refund Processed: `{{payment.order_id}}` | Order Id for which refund is being processed |
| Refund Processed: `{{refund.id}}` | Refund ID |
| Refund Processed: `{{refund.payment_id}}` | Payment ID |
| Refund Processed: `{{customer.mobile}}` | Mobile of the customer to whom the Refund is sent |
| Refund Processed: `{{customer.email}}` | Email of the customer to whom the Refund is sent |
***
4. **Authorize**
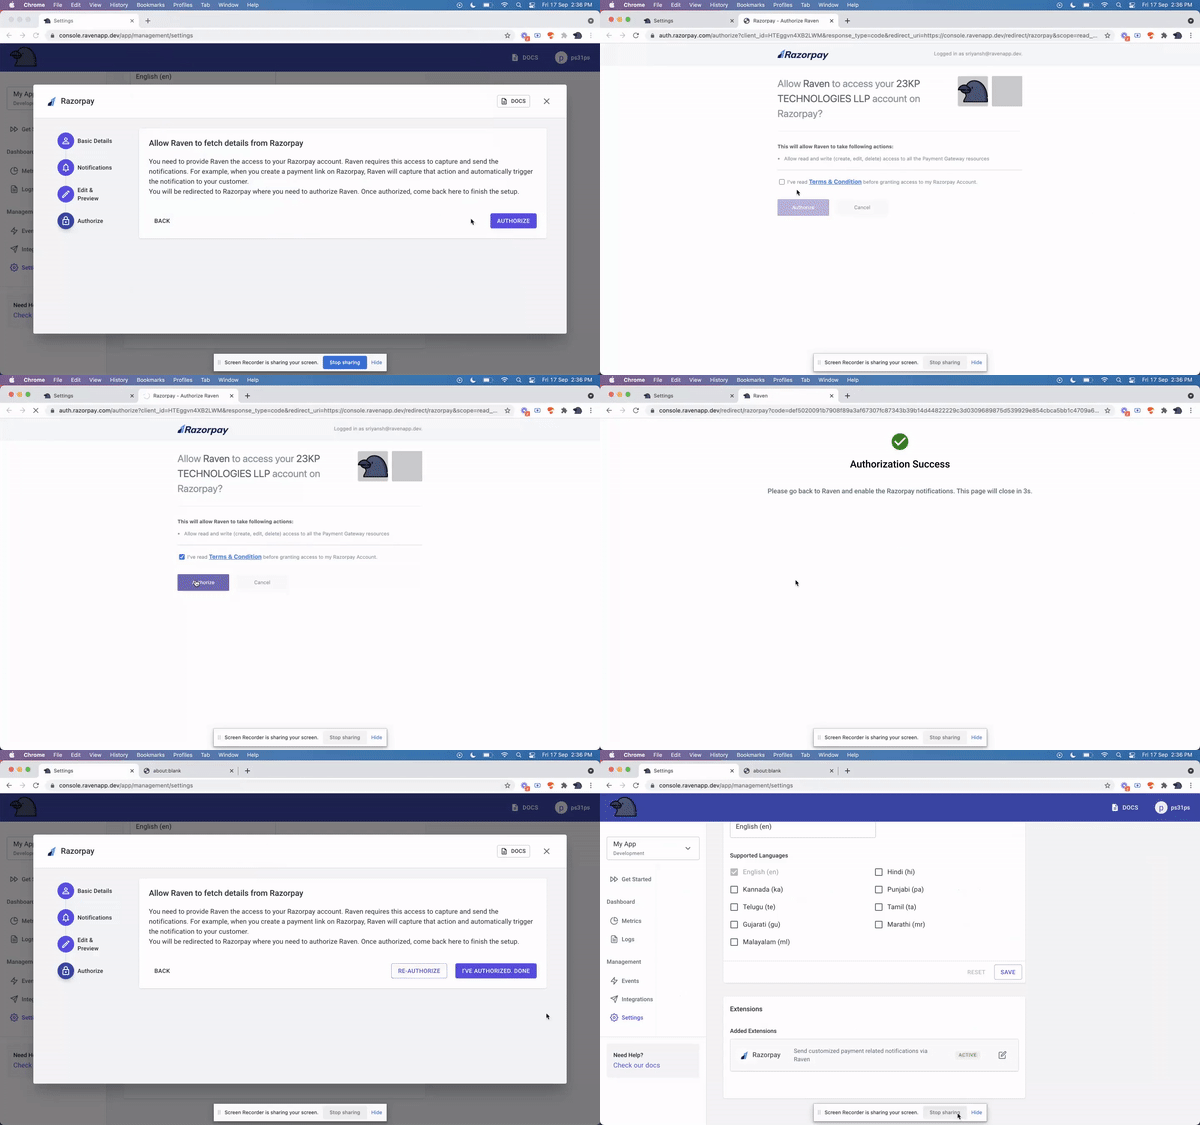
As a last step, you need to provide Raven the access to your Razorpay account.
Raven requires this access to capture events from your Razorpay account and send
the notifications. You will be redirected to Razorpay where you need to
authorize Raven. Once done the setup will be complete.
All done! You will see all the live notifications when you click the Razorpay
extension in Settings tab. You can enable or disable a notification if you
want to halt it temporarily.
 ### Step 3. Setup
A setup dialog will open. Continue with the the Setup. Follow the steps as
mentioned below:
1. **Account Details**
Provide your Razorpay account name and logo. We will use these details to create
notifications with your branding.
### Step 3. Setup
A setup dialog will open. Continue with the the Setup. Follow the steps as
mentioned below:
1. **Account Details**
Provide your Razorpay account name and logo. We will use these details to create
notifications with your branding.
 2. **Select Notifications**
Select the notifications you wish to send. Currently we support the following:
Invoice created, Payment Link Created, Payment Captured, Refund Processed &
Subscription Halted. Whenever any of this action happens in your Razorpay
account, Raven will receive this event and trigger the notification.
2. **Select Notifications**
Select the notifications you wish to send. Currently we support the following:
Invoice created, Payment Link Created, Payment Captured, Refund Processed &
Subscription Halted. Whenever any of this action happens in your Razorpay
account, Raven will receive this event and trigger the notification.
 **3. Edit & Preview Notifications**
Edit the notifications that you selected in the first step. You can
* Edit which channels you want to send that notification on (like SMS, Email or
WhatsApp).
* Add your own integrations or contact us if you need help in setting them up.
* Edit the SMS and Email content of the notifications. We have an email designer
where you can design your email notifications with your branding.
**3. Edit & Preview Notifications**
Edit the notifications that you selected in the first step. You can
* Edit which channels you want to send that notification on (like SMS, Email or
WhatsApp).
* Add your own integrations or contact us if you need help in setting them up.
* Edit the SMS and Email content of the notifications. We have an email designer
where you can design your email notifications with your branding.
 While editing the templates, you would see some content like this
`{{short_url}}` . This is a dynamic parameter and will get replaced by its
actual value based on the value sent by Razorpay. We currently support the
following dynamic parameters -
| Parameter | Description |
| ----------------------------------------------------- | ------------------------------------------------- |
| `{{merchant_name}}` | |
| `{{logo_url}}` | |
| Invoice/Payment link Created: `{{amount}}` | |
| Invoice/Payment link Reference Id: `{{reference_id}}` | |
| Invoice/Payment link Created: `{{short_url}}` | |
| Invoice/Payment link Created: `{{currency}}` | |
| Invoice/Payment link Created: `{{customer.email}}` | Email of the customer to whom the Invoice is sent |
| Payment Captured: `{{customer.email}}` | Email of the customer who made the payment |
| Refund Processed: `{{amount}}` | Refund Amount |
| Refund Processed: `{{payment.order_id}}` | Order Id for which refund is being processed |
| Refund Processed: `{{refund.id}}` | Refund ID |
| Refund Processed: `{{refund.payment_id}}` | Payment ID |
| Refund Processed: `{{customer.mobile}}` | Mobile of the customer to whom the Refund is sent |
| Refund Processed: `{{customer.email}}` | Email of the customer to whom the Refund is sent |
***
4. **Authorize**
As a last step, you need to provide Raven the access to your Razorpay account.
Raven requires this access to capture events from your Razorpay account and send
the notifications. You will be redirected to Razorpay where you need to
authorize Raven. Once done the setup will be complete.
While editing the templates, you would see some content like this
`{{short_url}}` . This is a dynamic parameter and will get replaced by its
actual value based on the value sent by Razorpay. We currently support the
following dynamic parameters -
| Parameter | Description |
| ----------------------------------------------------- | ------------------------------------------------- |
| `{{merchant_name}}` | |
| `{{logo_url}}` | |
| Invoice/Payment link Created: `{{amount}}` | |
| Invoice/Payment link Reference Id: `{{reference_id}}` | |
| Invoice/Payment link Created: `{{short_url}}` | |
| Invoice/Payment link Created: `{{currency}}` | |
| Invoice/Payment link Created: `{{customer.email}}` | Email of the customer to whom the Invoice is sent |
| Payment Captured: `{{customer.email}}` | Email of the customer who made the payment |
| Refund Processed: `{{amount}}` | Refund Amount |
| Refund Processed: `{{payment.order_id}}` | Order Id for which refund is being processed |
| Refund Processed: `{{refund.id}}` | Refund ID |
| Refund Processed: `{{refund.payment_id}}` | Payment ID |
| Refund Processed: `{{customer.mobile}}` | Mobile of the customer to whom the Refund is sent |
| Refund Processed: `{{customer.email}}` | Email of the customer to whom the Refund is sent |
***
4. **Authorize**
As a last step, you need to provide Raven the access to your Razorpay account.
Raven requires this access to capture events from your Razorpay account and send
the notifications. You will be redirected to Razorpay where you need to
authorize Raven. Once done the setup will be complete.